If you love the classic chocolate–peanut butter combo but want something lighter and more macro-friendly, these High Protein Homemade Reese’s Cup deliver the flavor without the excess. They’re rich, balanced, and designed for everyday snacking, not just cheat days.
This recipe takes inspiration from a familiar favorite, then rebuilds it with smarter ratios, a creamy protein-boosted filling, and a cleaner finish. The result is a freezer-set treat that tastes indulgent, stores well, and fits neatly into a high-protein routine.
Recipe Card
High Protein Homemade Reese’s Cup
Yield: 12 cups
Prep Time: 20 minutes
Chill Time: 60–90 minutes
Total Time: About 1 hour 30 minutes
Difficulty: Easy
Storage: Refrigerator or freezer
Estimated Macros (per cup):
Calories: ~95
Protein: ~6 g
Carbs: ~7 g
Fat: ~5 g
Ingredients
Chocolate Shell
- 110 g dark chocolate (70–85% cocoa)
- 10 g coconut oil
Protein Peanut Butter Filling
- 30 g vanilla whey or casein protein powder
- 30 g powdered peanut butter
- 25 g peanut cookie–style powder or finely ground peanut biscuits
- 1–2 teaspoons zero-calorie sweetener, to taste
- Cold water, added gradually
- Fine sea salt, small pinch
Finish
- Sea salt flakes, optional
Instructions
- Add the dark chocolate and coconut oil to a heat-safe bowl.
Microwave in short intervals, stirring between each, until fully melted and glossy. - Spoon a thin layer of melted chocolate into 12 silicone muffin cups.
Tilt or swirl each mold so the chocolate lightly coats the sides. - Place the molds in the freezer for 5–7 minutes until just set.
They should feel firm but not brittle. - In a separate bowl, mix the protein powder, powdered peanut butter, cookie powder, sweetener, and salt.
Stir thoroughly to remove any dry pockets. - Add cold water one tablespoon at a time, mixing until the filling reaches a smooth, spreadable consistency.
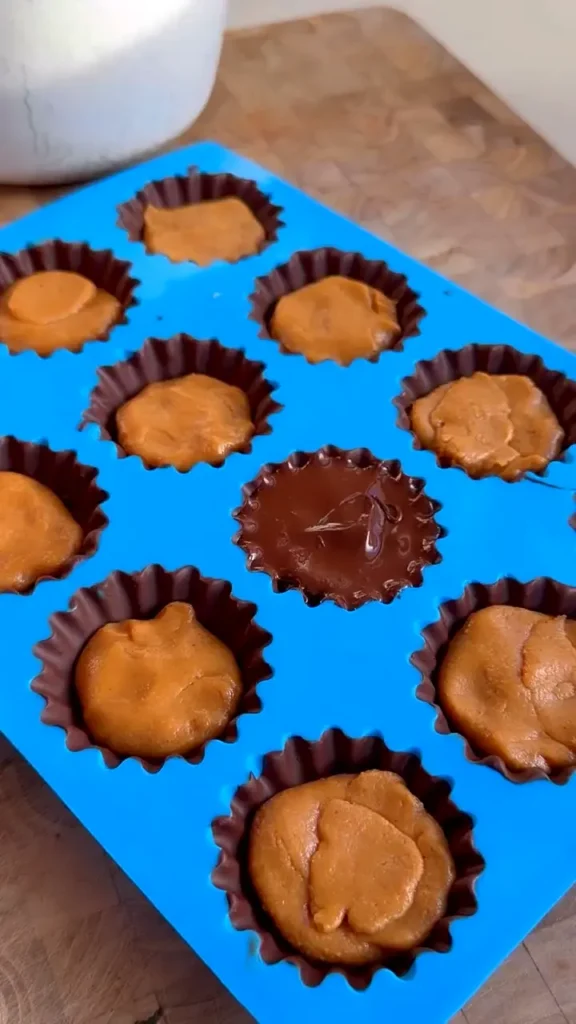
It should resemble thick natural peanut butter. - Divide the filling evenly among the chilled cups.
Press gently to flatten, leaving space around the edges. - Spoon the remaining melted chocolate over the filling, fully sealing each cup.
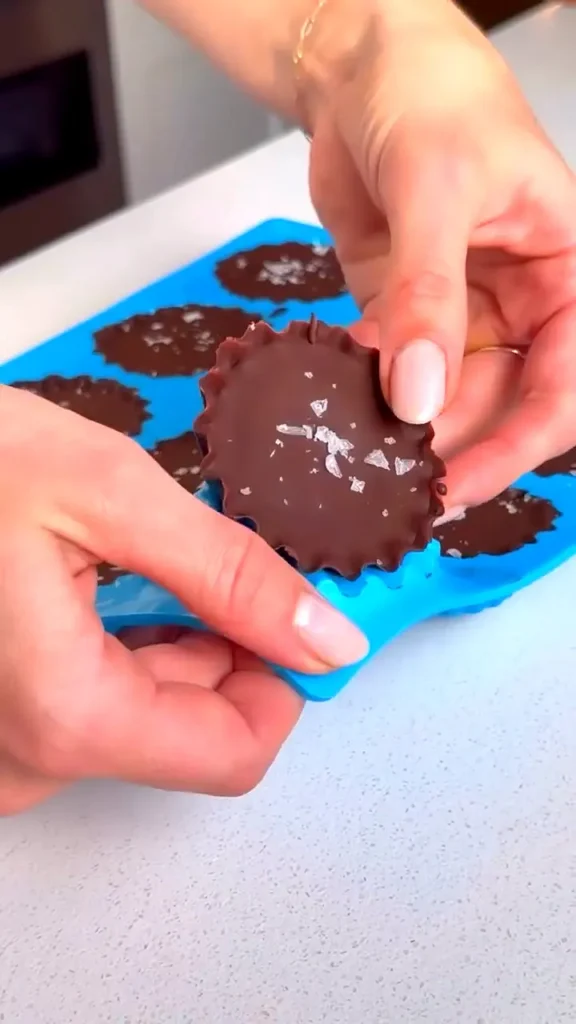
Tap the tray lightly to smooth the tops. - Sprinkle with sea salt flakes if using.
Freeze for 60–90 minutes until fully set. - Transfer to the refrigerator for storage.
The texture improves after several hours of chilling.
Why This Recipe Works for High-Protein Diets
Traditional peanut butter cups rely heavily on sugar and fat for structure. This version shifts the balance by using protein powder and powdered peanut butter as the backbone of the filling.
Protein powders absorb moisture and firm up when chilled. That property allows you to use less fat while keeping a creamy bite.
Powdered peanut butter adds flavor without excess oils. It also blends smoothly with protein powder, preventing the chalky texture common in low-calorie desserts.
Choosing the Right Chocolate
Dark chocolate does more than add richness. Higher cocoa percentages melt more smoothly and harden cleanly when chilled.
A bar between 70% and 85% cocoa strikes the best balance. It’s intense enough to offset the sweet filling without overpowering it.
Coconut oil is used sparingly here. It improves melt consistency and gives the shell a clean snap once set.
Getting the Filling Texture Just Right
The filling consistency determines whether your cups feel creamy or dry. This step deserves attention.
Always add water slowly. Protein powders hydrate quickly, and it’s easier to thin a thick mixture than fix an overly runny one.
If the filling feels stiff, let it rest for one minute. Hydration continues after mixing, often softening the texture naturally.
Sweetness Control and Flavor Balance
Zero-calorie sweeteners vary widely in intensity. Start small and adjust after tasting.
The dark chocolate shell already contributes bitterness and depth. The filling should be lightly sweet, not dessert-level sugary.
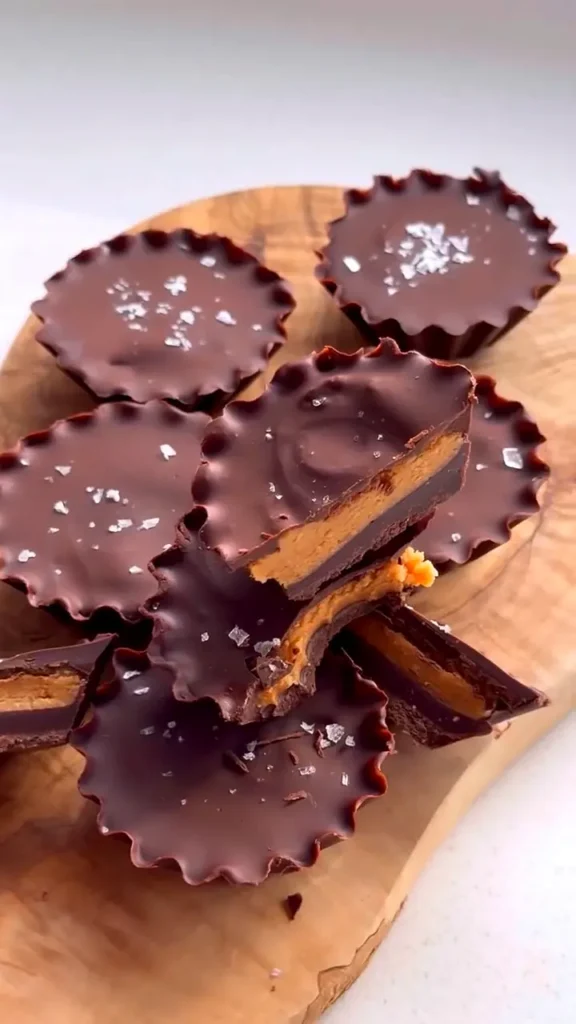
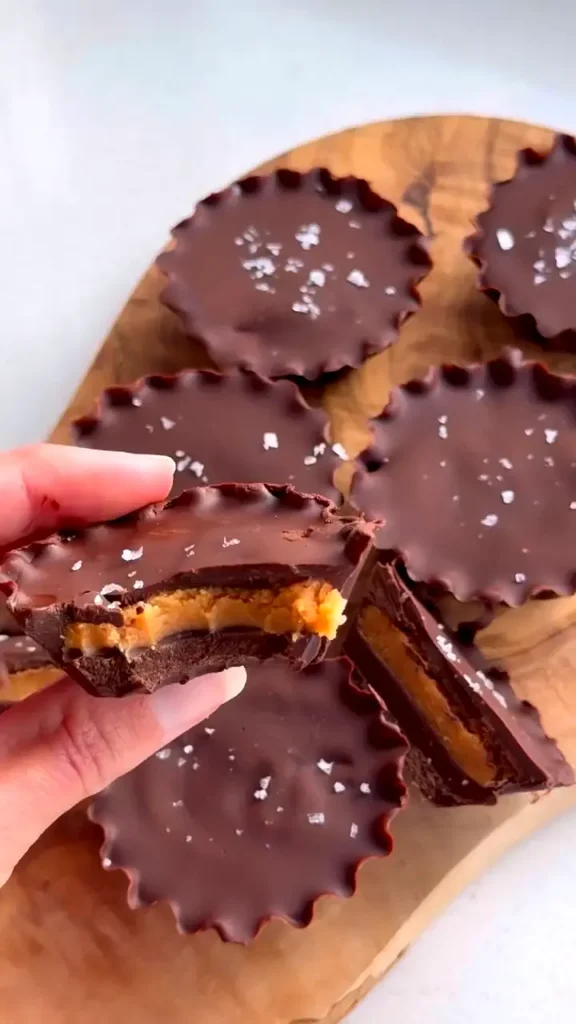
A pinch of fine sea salt inside the filling enhances peanut flavor. Salt flakes on top add contrast and a professional finish.
Storage, Shelf Life, and Texture Changes
These cups store best in the refrigerator. They maintain structure and stay creamy without becoming brittle.
In the freezer, they last longer but harden significantly. Let frozen cups sit at room temperature for 3–5 minutes before eating.
Over time, the filling firms slightly as moisture redistributes. Many people prefer the texture after 24 hours of chilling.
Smart Variations Without Breaking the Macros
You can customize these cups without compromising their macro profile.
Swap vanilla protein for chocolate protein to deepen the filling flavor. Reduce sweetener slightly to avoid overpowering cocoa notes.
For crunch, add finely chopped roasted peanuts to the filling. Keep the quantity small to maintain calorie control.
If you prefer a softer shell, reduce the coconut oil slightly. The cups will be less snappy but more melt-in-the-mouth.
Common Mistakes and How to Avoid Them
Overheating chocolate is the most frequent issue. Microwave in short bursts and stir often to prevent graininess.
Skipping the initial shell set causes filling bleed-through. Always chill the base layer before adding the center.
Using warm water in the filling leads to loose texture. Cold water helps the protein hydrate evenly and stay thick.
Frequently Asked Questions
Can I make these without silicone molds?
Yes, paper liners inside a muffin tin work. The cups may be less smooth but will still set properly.
Do these taste like traditional peanut butter cups?
They’re similar in flavor but lighter and less sweet. The peanut taste is pronounced, with a darker chocolate finish.
What protein powder works best?
A whey-casein blend gives the creamiest texture. Pure whey works but sets slightly firmer when cold.
Can I use milk chocolate instead of dark?
You can, but the cups will be sweeter and higher in calories. Dark chocolate provides better balance and structure.
Why did my filling turn grainy?
Too little liquid or uneven mixing causes this. Add a small splash of water and stir until smooth.
Are these suitable for meal prep?
Yes, they’re ideal for weekly prep. Store them chilled and portion easily throughout the week.
These high protein chocolate peanut butter cups prove that macro-friendly desserts don’t need to feel like compromises. With careful ratios, proper chilling, and attention to texture, you get a snack that’s functional, satisfying, and genuinely enjoyable.

High Protein Homemade Reese’s Cup
Description
Ingredients
Chocolate Shell
- 110 g dark chocolate 70–85% cocoa, chopped
- 10 g coconut oil
Protein Peanut Butter Filling
- 30 g vanilla whey or casein protein powder or a whey/casein blend
- 30 g powdered peanut butter
- 25 g peanut cookie-style powder or finely crushed peanut biscuits/cookies
- 2 tsp zero-calorie sweetener adjust to taste
- 3 tbsp cold water add gradually, more as needed
- 1 pinch fine sea salt
Topping
- sea salt flakes optional, for topping
Instructions
Make the Chocolate Shell
- Add the dark chocolate and coconut oil to a microwave-safe bowl. Microwave for 30–45 seconds, stir well, then microwave in 15–20 second bursts until fully melted, smooth, and glossy.
- Spoon a thin layer of melted chocolate into 12 silicone muffin cups. Tilt/swirl to coat the bottom and slightly up the sides.
- Freeze for 5–7 minutes until the chocolate base is set.
Mix the Protein PB Filling
- In a separate bowl, whisk together the protein powder, powdered peanut butter, cookie powder, sweetener, and a pinch of fine sea salt to prevent clumps.
- Add cold water 1 tablespoon at a time, stirring between additions, until the mixture becomes smooth and thick like natural peanut butter. Add a little more water if needed.
Assemble and Set
- Divide the filling evenly among the 12 cups. Press gently to flatten, keeping a small border so the chocolate can seal around the filling.
- Pour or spoon the remaining melted chocolate over the filling to fully cover and seal each cup. Tap the molds lightly to smooth the tops.
- Sprinkle with sea salt flakes (optional). Freeze for about 60 minutes, or until fully set.
- Store the cups in the refrigerator for a firmer texture and best bite. Let frozen cups sit at room temperature for a few minutes before eating.
Notes
- For the smoothest shell, melt chocolate gently in short bursts and stir often to avoid overheating.
- Add water to the filling slowly; different protein powders absorb liquid differently, so you may need slightly more or less.
- Silicone molds release cleanly; if using paper liners, chill well and peel carefully for best results.
- These taste even better after a few hours in the fridge as the filling firms up and the flavors meld.
Leave a Reply